The After Effects Color Difference Key
1 Introduction
The Color Difference Matte effect bundled with After Effects has been very useful to me on a DV greenscreen project. It managed to pull a matte for fine black hair much better than Keylight did. Moreover, Keylight had problems in areas where sharpening artefacts (those bright borders introduced by the camera's circuits, not the 4:1:1 compression) couldn't be dealt with by eroding the matte: under a person's armpits and between the legs.
So, when I got the Fusion Training Edition I wondered if it was possible to rebuild my beloved After Effects plugin. This document outlines my (successful) reverse-engineering attempt. My home-brewn keyer turned out to work great on DV footage, keeping fine hair detail and producing an edge that doesn't flicker despite all the DV noise.
I have no idea where the algorithm originates and whether it's been patented. This page is intended to be an educational research project. From what I've found, there might be some similarities to the color difference algorithm outlined in Steve Wright's book "Digital Compositing For Film and Video" (Focal Press, 2002) but Adobe's algorithm (if indeed it has been developed by Adobe) is more flexible and far more advanced.
2 Usage
This is how to use the keyer in After Effects (see end of document for a real-life example):
- A key colour is sampled from the image. This can be any colour, not just blue or green.
- Automatically, 2 intermediate mattes are pulled (called A and B).
- Both mattes can be tweaked by applying a Photoshop-like "levels" correction, by setting a black and white point as well as adjusting the matte's gamma.
- Both mattes are combined by a yet unknown operation.
- The resulting matte can once more be tweaked like matte A and matte B.
3 The Algorithm
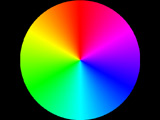 figure 1
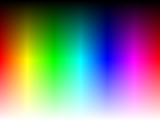 figure 2
Let's reverse-engineer the algorithms used by feeding it some fully saturated hue gradients like the ones in figures 1-2. The latter also has a gradient from black to white like in Photoshop's colour picker. The key colour used for this experiment is pure blue (R,G,B = [0,0,1]). As you will see by trying random colours, the resulting matte is only affected by the key colour's hue.
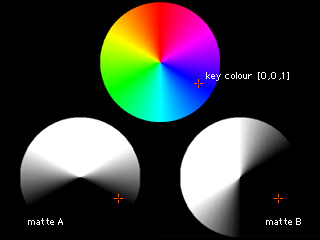 figure 3: hue affecting intermediate mattes
Since the plugins lets us display its intermediate mattes, the following can be seen immediately:
- The keyer is working in HLS space.
- Matte B is pulled on the key colour's hue, while Matte A is pulled on the key colour's hue minus 60 degrees.
- Every hue that is less than 60 degrees from the key colour is completely keyed out.
- There's a soft shoulder of 60 degrees on each side.
Due to the fact that the hue scale is a circle, we will have to deal with wrapping around 0 and 1. This is an implementation detail that will be taken care of in our final algorithm.
If the test gradient's saturation channel is decreased in HLS mode, the resulting matte converges to a mid-grey of [0.5, 0.5, 0.5] which is equivalent to a mid-grey image being merged over the mattes we have created by formula 1. The less saturated a pixel is, the higher the opacity of the merge. The math is as follows (it's also the basic over composite for RGBA images):
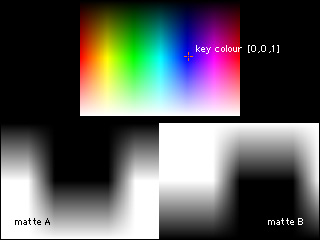 figure 4: luminance affecting intermediate mattes
 figure 5: combined matte
A pixel's luminance also affects the matte that is pulled. Unlike with saturation, matte A and matte B react in different ways to luminance values. For matte A, the darker a pixel, the darker the resulting matte will be. A luminance of 0.5 doesn't change the alpha channel at all, and a luminance of 1 will boost the alpha to 1 as well. For matte B, it's the opposite. This corresponds to the "hard light" blend mode. The math is as follows:
Finally, the combined matte is created by blending matte A and matte B together using the "screen" mode.
4 Building a flow in Fusion
Recreating the Colour Difference Key in Fusion is simple. All that is needed are two custom tools as well as color space conversion and color correction nodes. A probe modifier could be used to provide an easy way to sample the key colour. Moreover, everything should take place in float16 mode for extra precision.
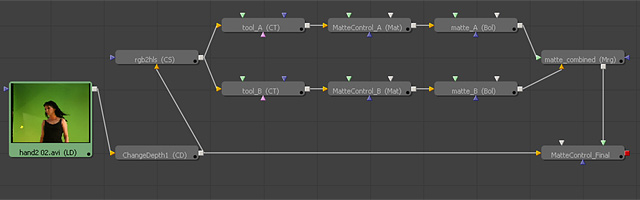 figure 6: an example flow
Connect a color space tool (convert from RGB to HLS) to the input image and branch off two custom tools with the following settings:
| Setup Variables | |
|---|---|
| n1 | = KEY. Ranging zero to one, or connected a probe modifier which samples the red channel of the source image after it has been converted to HLS space. |
| s1 = frac(n1-1/6+1000) | Setup 1 for matte A. It could just be "n1 - 1/6", but this will allow you to scrub the slider beyond the valid range of 0..1 without the algorithm breaking down. |
| s1 = frac(n1+1000) | Setup 1 differs for matte B. |
| Intermediate Values | |
| i1 = r1-s1 | The distance between key hue and pixel's hue |
| i2 = if(i1>0.5, s1-r1+1, if(i1<-0.5, r1+1-s1, abs(i1))) | Wraps the distance on the circular hue scale |
| i3 = if(i2<1/6, 0, if(i2>2/6, 1, (i2-1/6)*6)) | Formula for hue |
| i4 = b1*i3+(1-b1)*0.5 | Formula for saturation |
| Channel Calculation | |
| alpha = if(g1<0.5, 2*i4*g1, 1-2*(1-i4)*(1-g1)) | Luminance part for matte A |
| alpha = if(g1<0.5, 1-2*(1-i4)*g1, 2*i4*(1-g1)) | Luminance part for matte B |
Connect a matte control to each branch, use channel booleans to turn the resulting alpha channels into greyscale images with solid alpha. Combine both branches with a merge node set to "screen". The combined matte has to be fed to the source image using another matte control which allows for final tweaks as well as spill removal.
Download the example composition (requires Fusion5 Learning Edition).
It should be easy to do this in Shake as well, but my first attempt failed due to a different behaviour of the
color space conversion nodes. Maybe some other time.
Comments and improvements welcome!
Update: Rafal of miafx has kindly created a
composition for Fusion's Retail Edition.
5 Critique
By mistake I found out that the hue formula for matte A isn't perfect for greenscreen work. By keying out hue values 60 degrees less than the key colour, it will eradicate too many flesh tones, especially if your greenscreen has a yellow cast. The remedy is to change -60 degrees to +60 degrees:
For bluescreens, the original formula might be better since it moves the key away from reddish colours, but I haven't checked this yet.
6 Step-by-Step Example
This is a step-by-step demonstration of how to use the keyer for real greenscreen work (using the modified formula). Click the numbers to advance through the slides. The test image is from a low-budget music video I did in 2005.
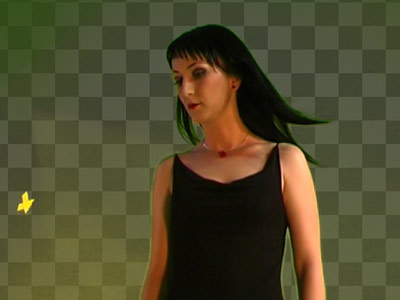
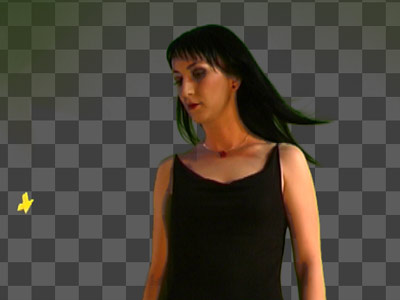
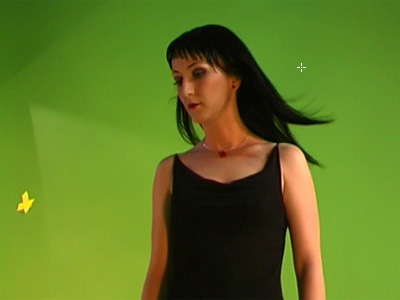 Behold, the worst greenscreen ever. It was the first time I've ever set one up :-) You will see, though,
that the Color Difference Keyer will be able to deal with it astonishingly well. The crosshairs is
where the key colour was sampled.
Behold, the worst greenscreen ever. It was the first time I've ever set one up :-) You will see, though,
that the Color Difference Keyer will be able to deal with it astonishingly well. The crosshairs is
where the key colour was sampled.
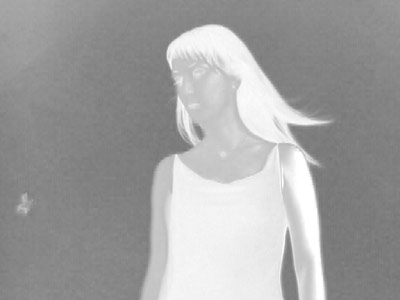
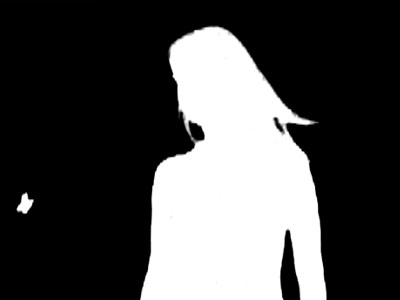
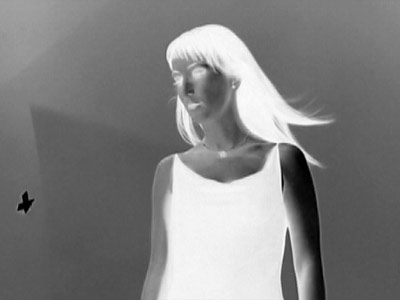 This is matte B without any postprocessing. It's pulled on the green background colour.
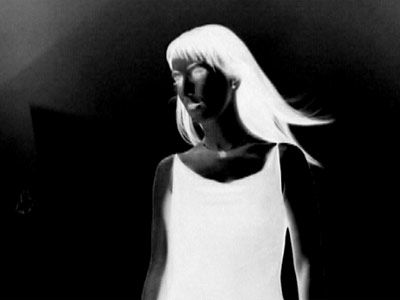
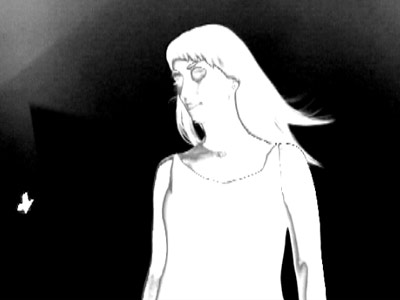
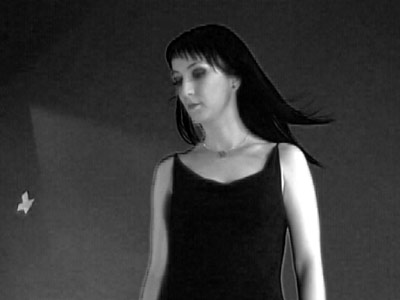 This is matte A without any postprocessing. It looks like the inverse of matte B but it is also pulled on
a different hue. I don't know who named them A and B. I think the order should be reversed.
This is matte A without any postprocessing. It looks like the inverse of matte B but it is also pulled on
a different hue. I don't know who named them A and B. I think the order should be reversed.
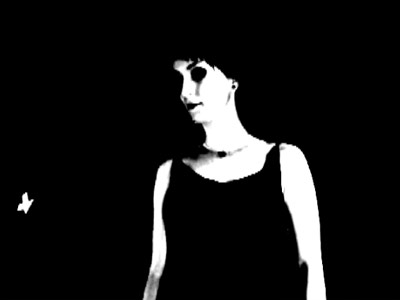
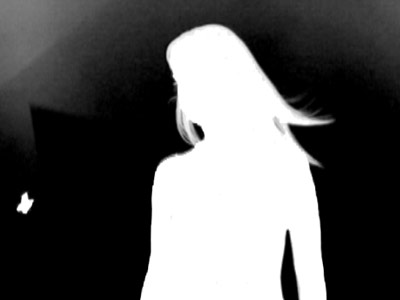
 This is the combined matte without any postprocessing.
 Matte B has been tweaked to be a real chroma key on the green background. Since it's so badly lit, I
can't get a clean matte around the top of her head without losing those fine strands of hair. This will
have to be dealt with later.
Matte B has been tweaked to be a real chroma key on the green background. Since it's so badly lit, I
can't get a clean matte around the top of her head without losing those fine strands of hair. This will
have to be dealt with later.
 This is the combined result after tweaking matte B. Matte A remains yet untouched. Note the bright halo
around her arm and waist. It's a DV artefact due to sharpening.
This is the combined result after tweaking matte B. Matte A remains yet untouched. Note the bright halo
around her arm and waist. It's a DV artefact due to sharpening.
 Matte A has been tweaked to include the skin tones which are not present in matte B. Moreover, the area
around her head has to be completely black so it won't add to matte B which is fine the way it is. It's
also important to remove the bright pixels responsible for the halo meantioned before. This can be done
by using blur, gamma and contract/expand in the matte control.
Matte A has been tweaked to include the skin tones which are not present in matte B. Moreover, the area
around her head has to be completely black so it won't add to matte B which is fine the way it is. It's
also important to remove the bright pixels responsible for the halo meantioned before. This can be done
by using blur, gamma and contract/expand in the matte control.
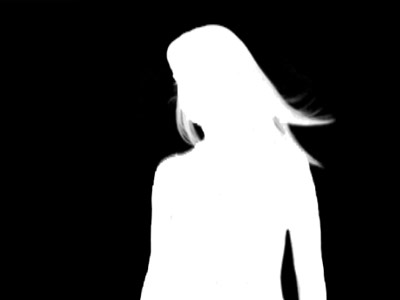
 This is the combined result after tweaking matte A. Its high treshold has been adjusted to make it solid.
Looking good!
This is the combined result after tweaking matte A. Its high treshold has been adjusted to make it solid.
Looking good!
 Wait, not so fast. This is the combined alpha channel. As you can see, the edges between matte A and B
are visible. This could be solved by lowering the high threshold even more but it would destroy the holes
and semi-transparent areas between her hair strands. A much better solution is to just add a hard matte
pulled by a different keyer.
Wait, not so fast. This is the combined alpha channel. As you can see, the edges between matte A and B
are visible. This could be solved by lowering the high threshold even more but it would destroy the holes
and semi-transparent areas between her hair strands. A much better solution is to just add a hard matte
pulled by a different keyer.
 A hard matte pulled by the Ultrakeyer.
 The mattes of the Color Difference Keyer and Ultrakeyer maxed together. Her left shoulder is still a problem
and the Ultrakeyer's matte thickened her left arm as well. But this is just quick & dirty for
demonstration purposes. A solution might be to use the hard matte as a mask to strengthen the soft matte instead
of just maxing them together.
The mattes of the Color Difference Keyer and Ultrakeyer maxed together. Her left shoulder is still a problem
and the Ultrakeyer's matte thickened her left arm as well. But this is just quick & dirty for
demonstration purposes. A solution might be to use the hard matte as a mask to strengthen the soft matte instead
of just maxing them together.
 That's the final result after garbage matting and using a soft mask to increase the matte's contrast around
the top of her head.
That's the final result after garbage matting and using a soft mask to increase the matte's contrast around
the top of her head.
7 About the Author
Stefan Ihringer is a freelance motion graphics and VFX artist currently located in Stuttgart, Germany. His portfolio includes trade show work for Daimler-Chrysler and Lexus as well as TV commercials and corporate movies. Take a peek at bildfehler.de.